The assignment from this week was to design, make and document a press-fit construction kit. This served as a great way to start familiarizing myself with CAD software and to start thinking about how 2D can translate into 3D. I went back and forth for a few days about what I wanted to build: first a dock for game controllers that are always just lying around, then something more artsy like a replica of a fern. Ultimately, nostalgia won out. I recently moved into a new apartment and am no longer living with one of my good friends in the area, so I wanted to make a replica of something from the old place. In the kitchen, there was a 6 cell x 6 cell shot glass rack that actually looked quite nice when it was full. So, after wanting to make my own version out of cardboard, I set out on my journey through SolidWorks.
I haven't used SolidWorks before, so I was pleasantly surprised to learn how user-friendly it is. I'm sure that's not the case for every feature, but for 2D sketches with measurements and the ability to trim unwanted lines I'd find it hard to beat. With a little help from the SolidWorks documentation, I was able to produce the following sketches:

The largest piece will serve as the back of the shelf, and the others (top to bottom on the left side) will serve as the shelf rows, columns, top/bottom and sides, respectively. I found that from here it was very easy to export these sketches as .dwg, which read perfectly into Rhino. I don't find Rhino as intuitive as SolidWorks, but after some messing around (and really great advice from a section classmate about joining all the perimeter lines, thank you!) I was able to get all the pieces into a 24x36 inch canvas to send to the laser cutter. Here's a shot of the laser cutter in action:

I used the 75W Epilog laser cutter and found that the suggested settings of 35/20/500 (speed/power/frequency) and 2 passes made beautiful cuts. In most cases, 1 pass was actually sufficient, but 5-10% of the traces needed a second pass. At the moment, I'm not sure if this is because of fluctuations in the cardboard or fluctuations in the laser, but I suspect that the former is more likely to be responsible. Note: before I learned about joining the perimeter lines the laser was moving all over the place and took a very long time to cut out the back piece. From here, I was able to move onto assembly in no time:
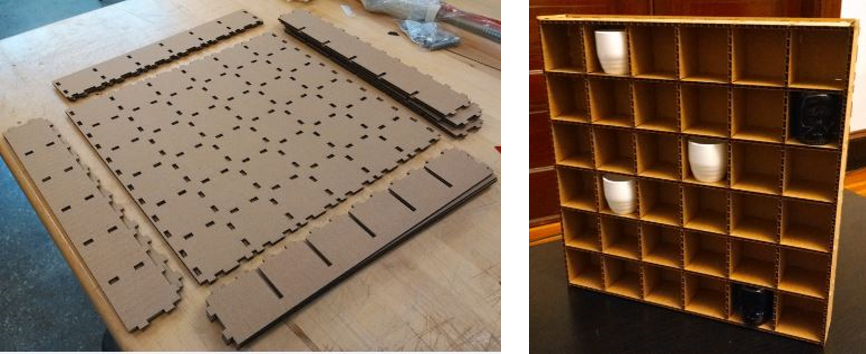
So there we have it, a press-fit cardboard shot glass rack! Did I mention that I also miss the number of shot glasses that my former roommate had?
Overall, I'm very happy with how the project turned out. I did find that not all of the pieces fit as well as they did during an initial test fit, but they all held in place. Thinking back, when I was setting up the cutting window in Rhino I may have accidentally (and slightly) re-scaled the imported sketches. Next, I'd like to try this design out with a sturdier material, and I'd like to use the laser to etch artwork or letters into the side panels.